學習前言
一起來看看Efficientdet的keras實現吧�,順便訓練一下自己的數據����。

什么是Efficientdet目標檢測算法
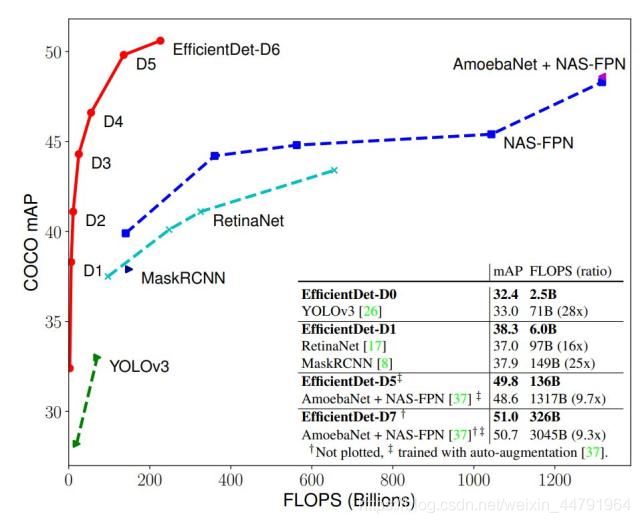
最近����,谷歌大腦 Mingxing Tan���、Ruoming Pang 和 Quoc V. Le 提出新架構 EfficientDet,結合 EfficientNet(同樣來自該團隊)和新提出的 BiFPN�,實現新的 SOTA 結果��。
源碼下載
https://github.com/bubbliiiing/efficientdet-keras
喜歡的可以點個star噢。
Efficientdet實現思路
一����、預測部分
1、主干網絡介紹

Efficientdet采用Efficientnet作為主干特征提取網絡�����。EfficientNet-B0對應Efficientdet-D0�����;EfficientNet-B1對應Efficientdet-D1;以此類推。
EfficientNet模型具有很獨特的特點��,這個特點是參考其它優(yōu)秀神經網絡設計出來的。經典的神經網絡特點如下:
1���、利用殘差神經網絡增大神經網絡的深度,通過更深的神經網絡實現特征提取��。
2�����、改變每一層提取的特征層數,實現更多層的特征提取,得到更多的特征��,提升寬度�。
3����、通過增大輸入圖片的分辨率也可以使得網絡可以學習與表達的東西更加豐富���,有利于提高精確度。
EfficientNet就是將這三個特點結合起來��,通過一起縮放baseline模型(MobileNet中就通過縮放α實現縮放模型,不同的α有不同的模型精度�����,α=1時為baseline模型�����;ResNet其實也是有一個baseline模型�����,在baseline的基礎上通過改變圖片的深度實現不同的模型實現)�����,同時調整深度��、寬度、輸入圖片的分辨率完成一個優(yōu)秀的網絡設計����。
在EfficientNet模型中�,其使用一組固定的縮放系數統(tǒng)一縮放網絡深度���、寬度和分辨率����。
假設想使用 2N倍的計算資源����,我們可以簡單的對網絡深度擴大αN倍、寬度擴大βN �����、圖像尺寸擴大γN倍����,這里的α,β,γ都是由原來的小模型上做微小的網格搜索決定的常量系數�。
如圖為EfficientNet的設計思路���,從三個方面同時拓充網絡的特性。

本博客以Efficientnet-B0和Efficientdet-D0為例����,進行Efficientdet的解析�����。
Efficientnet-B0由1個Stem+16個大Blocks堆疊構成,16個大Blocks可以分為1��、2�、2�����、3�����、3、4���、1個Block�����。Block的通用結構如下�,其總體的設計思路是Inverted residuals結構和殘差結構,在3x3或者5x5網絡結構前利用1x1卷積升維���,在3x3或者5x5網絡結構后增加了一個關于通道的注意力機制,最后利用1x1卷積降維后增加一個大殘差邊�����。
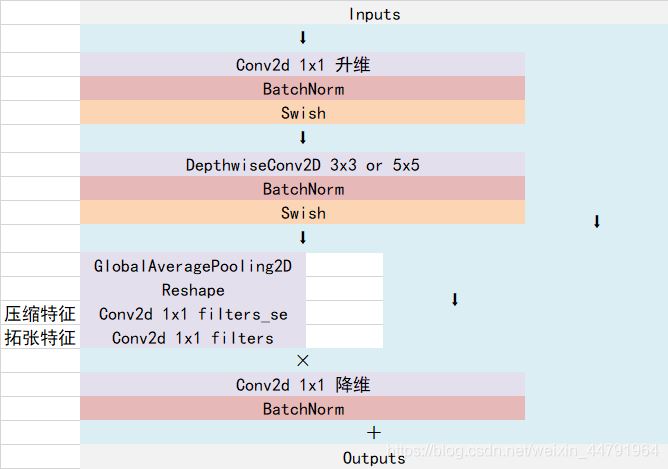
整體結構如下:

最終獲得三個有效特征層傳入到BIFPN當中進行下一步的操作�����。
from __future__ import absolute_import
from __future__ import division
from __future__ import print_function
import os
import json
import math
import string
import collections
import numpy as np
from keras import backend
from six.moves import xrange
from nets.layers import BatchNormalization
from keras import layers
BASE_WEIGHTS_PATH = (
'https://github.com/Callidior/keras-applications/'
'releases/download/efficientnet/')
WEIGHTS_HASHES = {
'efficientnet-b0': ('163292582f1c6eaca8e7dc7b51b01c61'
'5b0dbc0039699b4dcd0b975cc21533dc',
'c1421ad80a9fc67c2cc4000f666aa507'
'89ce39eedb4e06d531b0c593890ccff3'),
'efficientnet-b1': ('d0a71ddf51ef7a0ca425bab32b7fa7f1'
'6043ee598ecee73fc674d9560c8f09b0',
'75de265d03ac52fa74f2f510455ba64f'
'9c7c5fd96dc923cd4bfefa3d680c4b68'),
'efficientnet-b2': ('bb5451507a6418a574534aa76a91b106'
'f6b605f3b5dde0b21055694319853086',
'433b60584fafba1ea3de07443b74cfd3'
'2ce004a012020b07ef69e22ba8669333'),
'efficientnet-b3': ('03f1fba367f070bd2545f081cfa7f3e7'
'6f5e1aa3b6f4db700f00552901e75ab9',
'c5d42eb6cfae8567b418ad3845cfd63a'
'a48b87f1bd5df8658a49375a9f3135c7'),
'efficientnet-b4': ('98852de93f74d9833c8640474b2c698d'
'b45ec60690c75b3bacb1845e907bf94f',
'7942c1407ff1feb34113995864970cd4'
'd9d91ea64877e8d9c38b6c1e0767c411'),
'efficientnet-b5': ('30172f1d45f9b8a41352d4219bf930ee'
'3339025fd26ab314a817ba8918fefc7d',
'9d197bc2bfe29165c10a2af8c2ebc675'
'07f5d70456f09e584c71b822941b1952'),
'efficientnet-b6': ('f5270466747753485a082092ac9939ca'
'a546eb3f09edca6d6fff842cad938720',
'1d0923bb038f2f8060faaf0a0449db4b'
'96549a881747b7c7678724ac79f427ed'),
'efficientnet-b7': ('876a41319980638fa597acbbf956a82d'
'10819531ff2dcb1a52277f10c7aefa1a',
'60b56ff3a8daccc8d96edfd40b204c11'
'3e51748da657afd58034d54d3cec2bac')
}
BlockArgs = collections.namedtuple('BlockArgs', [
'kernel_size', 'num_repeat', 'input_filters', 'output_filters',
'expand_ratio', 'id_skip', 'strides', 'se_ratio'
])
# defaults will be a public argument for namedtuple in Python 3.7
# https://docs.python.org/3/library/collections.html#collections.namedtuple
BlockArgs.__new__.__defaults__ = (None,) * len(BlockArgs._fields)
DEFAULT_BLOCKS_ARGS = [
BlockArgs(kernel_size=3, num_repeat=1, input_filters=32, output_filters=16,
expand_ratio=1, id_skip=True, strides=[1, 1], se_ratio=0.25),
BlockArgs(kernel_size=3, num_repeat=2, input_filters=16, output_filters=24,
expand_ratio=6, id_skip=True, strides=[2, 2], se_ratio=0.25),
BlockArgs(kernel_size=5, num_repeat=2, input_filters=24, output_filters=40,
expand_ratio=6, id_skip=True, strides=[2, 2], se_ratio=0.25),
BlockArgs(kernel_size=3, num_repeat=3, input_filters=40, output_filters=80,
expand_ratio=6, id_skip=True, strides=[2, 2], se_ratio=0.25),
BlockArgs(kernel_size=5, num_repeat=3, input_filters=80, output_filters=112,
expand_ratio=6, id_skip=True, strides=[1, 1], se_ratio=0.25),
BlockArgs(kernel_size=5, num_repeat=4, input_filters=112, output_filters=192,
expand_ratio=6, id_skip=True, strides=[2, 2], se_ratio=0.25),
BlockArgs(kernel_size=3, num_repeat=1, input_filters=192, output_filters=320,
expand_ratio=6, id_skip=True, strides=[1, 1], se_ratio=0.25)
]
CONV_KERNEL_INITIALIZER = {
'class_name': 'VarianceScaling',
'config': {
'scale': 2.0,
'mode': 'fan_out',
# EfficientNet actually uses an untruncated normal distribution for
# initializing conv layers, but keras.initializers.VarianceScaling use
# a truncated distribution.
# We decided against a custom initializer for better serializability.
'distribution': 'normal'
}
}
DENSE_KERNEL_INITIALIZER = {
'class_name': 'VarianceScaling',
'config': {
'scale': 1. / 3.,
'mode': 'fan_out',
'distribution': 'uniform'
}
}
def get_swish():
def swish(x):
return x * backend.sigmoid(x)
return swish
def get_dropout():
class FixedDropout(layers.Dropout):
def _get_noise_shape(self, inputs):
if self.noise_shape is None:
return self.noise_shape
symbolic_shape = backend.shape(inputs)
noise_shape = [symbolic_shape[axis] if shape is None else shape
for axis, shape in enumerate(self.noise_shape)]
return tuple(noise_shape)
return FixedDropout
def round_filters(filters, width_coefficient, depth_divisor):
filters *= width_coefficient
new_filters = int(filters + depth_divisor / 2) // depth_divisor * depth_divisor
new_filters = max(depth_divisor, new_filters)
if new_filters 0.9 * filters:
new_filters += depth_divisor
return int(new_filters)
def round_repeats(repeats, depth_coefficient):
return int(math.ceil(depth_coefficient * repeats))
def mb_conv_block(inputs, block_args, activation, drop_rate=None, prefix='', freeze_bn=False):
has_se = (block_args.se_ratio is not None) and (0 block_args.se_ratio = 1)
bn_axis = 3
Dropout = get_dropout()
filters = block_args.input_filters * block_args.expand_ratio
if block_args.expand_ratio != 1:
x = layers.Conv2D(filters, 1,
padding='same',
use_bias=False,
kernel_initializer=CONV_KERNEL_INITIALIZER,
name=prefix + 'expand_conv')(inputs)
x = layers.BatchNormalization(axis=bn_axis, name=prefix + 'expand_bn')(x)
x = layers.Activation(activation, name=prefix + 'expand_activation')(x)
else:
x = inputs
# Depthwise Convolution
x = layers.DepthwiseConv2D(block_args.kernel_size,
strides=block_args.strides,
padding='same',
use_bias=False,
depthwise_initializer=CONV_KERNEL_INITIALIZER,
name=prefix + 'dwconv')(x)
x = layers.BatchNormalization(axis=bn_axis, name=prefix + 'bn')(x)
x = layers.Activation(activation, name=prefix + 'activation')(x)
# Squeeze and Excitation phase
if has_se:
num_reduced_filters = max(1, int(
block_args.input_filters * block_args.se_ratio
))
se_tensor = layers.GlobalAveragePooling2D(name=prefix + 'se_squeeze')(x)
target_shape = (1, 1, filters) if backend.image_data_format() == 'channels_last' else (filters, 1, 1)
se_tensor = layers.Reshape(target_shape, name=prefix + 'se_reshape')(se_tensor)
se_tensor = layers.Conv2D(num_reduced_filters, 1,
activation=activation,
padding='same',
use_bias=True,
kernel_initializer=CONV_KERNEL_INITIALIZER,
name=prefix + 'se_reduce')(se_tensor)
se_tensor = layers.Conv2D(filters, 1,
activation='sigmoid',
padding='same',
use_bias=True,
kernel_initializer=CONV_KERNEL_INITIALIZER,
name=prefix + 'se_expand')(se_tensor)
if backend.backend() == 'theano':
# For the Theano backend, we have to explicitly make
# the excitation weights broadcastable.
pattern = ([True, True, True, False] if backend.image_data_format() == 'channels_last'
else [True, False, True, True])
se_tensor = layers.Lambda(
lambda x: backend.pattern_broadcast(x, pattern),
name=prefix + 'se_broadcast')(se_tensor)
x = layers.multiply([x, se_tensor], name=prefix + 'se_excite')
# Output phase
x = layers.Conv2D(block_args.output_filters, 1,
padding='same',
use_bias=False,
kernel_initializer=CONV_KERNEL_INITIALIZER,
name=prefix + 'project_conv')(x)
# x = BatchNormalization(freeze=freeze_bn, axis=bn_axis, name=prefix + 'project_bn')(x)
x = layers.BatchNormalization(axis=bn_axis, name=prefix + 'project_bn')(x)
if block_args.id_skip and all(
s == 1 for s in block_args.strides
) and block_args.input_filters == block_args.output_filters:
if drop_rate and (drop_rate > 0):
x = Dropout(drop_rate,
noise_shape=(None, 1, 1, 1),
name=prefix + 'drop')(x)
x = layers.add([x, inputs], name=prefix + 'add')
return x
def EfficientNet(width_coefficient,
depth_coefficient,
default_resolution,
dropout_rate=0.2,
drop_connect_rate=0.2,
depth_divisor=8,
blocks_args=DEFAULT_BLOCKS_ARGS,
model_name='efficientnet',
include_top=True,
weights='imagenet',
input_tensor=None,
input_shape=None,
pooling=None,
classes=1000,
freeze_bn=False,
**kwargs):
features = []
if input_tensor is None:
img_input = layers.Input(shape=input_shape)
else:
img_input = input_tensor
bn_axis = 3
activation = get_swish(**kwargs)
# Build stem
x = img_input
x = layers.Conv2D(round_filters(32, width_coefficient, depth_divisor), 3,
strides=(2, 2),
padding='same',
use_bias=False,
kernel_initializer=CONV_KERNEL_INITIALIZER,
name='stem_conv')(x)
# x = BatchNormalization(freeze=freeze_bn, axis=bn_axis, name='stem_bn')(x)
x = layers.BatchNormalization(axis=bn_axis, name='stem_bn')(x)
x = layers.Activation(activation, name='stem_activation')(x)
# Build blocks
num_blocks_total = sum(block_args.num_repeat for block_args in blocks_args)
block_num = 0
for idx, block_args in enumerate(blocks_args):
assert block_args.num_repeat > 0
# Update block input and output filters based on depth multiplier.
block_args = block_args._replace(
input_filters=round_filters(block_args.input_filters,
width_coefficient, depth_divisor),
output_filters=round_filters(block_args.output_filters,
width_coefficient, depth_divisor),
num_repeat=round_repeats(block_args.num_repeat, depth_coefficient))
# The first block needs to take care of stride and filter size increase.
drop_rate = drop_connect_rate * float(block_num) / num_blocks_total
x = mb_conv_block(x, block_args,
activation=activation,
drop_rate=drop_rate,
prefix='block{}a_'.format(idx + 1),
freeze_bn=freeze_bn
)
block_num += 1
if block_args.num_repeat > 1:
# pylint: disable=protected-access
block_args = block_args._replace(
input_filters=block_args.output_filters, strides=[1, 1])
# pylint: enable=protected-access
for bidx in xrange(block_args.num_repeat - 1):
drop_rate = drop_connect_rate * float(block_num) / num_blocks_total
block_prefix = 'block{}{}_'.format(
idx + 1,
string.ascii_lowercase[bidx + 1]
)
x = mb_conv_block(x, block_args,
activation=activation,
drop_rate=drop_rate,
prefix=block_prefix,
freeze_bn=freeze_bn
)
block_num += 1
if idx len(blocks_args) - 1 and blocks_args[idx + 1].strides[0] == 2:
features.append(x)
elif idx == len(blocks_args) - 1:
features.append(x)
return features
def EfficientNetB0(include_top=True,
weights='imagenet',
input_tensor=None,
input_shape=None,
pooling=None,
classes=1000,
**kwargs):
return EfficientNet(1.0, 1.0, 224, 0.2,
model_name='efficientnet-b0',
include_top=include_top, weights=weights,
input_tensor=input_tensor, input_shape=input_shape,
pooling=pooling, classes=classes,
**kwargs)
def EfficientNetB1(include_top=True,
weights='imagenet',
input_tensor=None,
input_shape=None,
pooling=None,
classes=1000,
**kwargs):
return EfficientNet(1.0, 1.1, 240, 0.2,
model_name='efficientnet-b1',
include_top=include_top, weights=weights,
input_tensor=input_tensor, input_shape=input_shape,
pooling=pooling, classes=classes,
**kwargs)
def EfficientNetB2(include_top=True,
weights='imagenet',
input_tensor=None,
input_shape=None,
pooling=None,
classes=1000,
**kwargs):
return EfficientNet(1.1, 1.2, 260, 0.3,
model_name='efficientnet-b2',
include_top=include_top, weights=weights,
input_tensor=input_tensor, input_shape=input_shape,
pooling=pooling, classes=classes,
**kwargs)
def EfficientNetB3(include_top=True,
weights='imagenet',
input_tensor=None,
input_shape=None,
pooling=None,
classes=1000,
**kwargs):
return EfficientNet(1.2, 1.4, 300, 0.3,
model_name='efficientnet-b3',
include_top=include_top, weights=weights,
input_tensor=input_tensor, input_shape=input_shape,
pooling=pooling, classes=classes,
**kwargs)
def EfficientNetB4(include_top=True,
weights='imagenet',
input_tensor=None,
input_shape=None,
pooling=None,
classes=1000,
**kwargs):
return EfficientNet(1.4, 1.8, 380, 0.4,
model_name='efficientnet-b4',
include_top=include_top, weights=weights,
input_tensor=input_tensor, input_shape=input_shape,
pooling=pooling, classes=classes,
**kwargs)
def EfficientNetB5(include_top=True,
weights='imagenet',
input_tensor=None,
input_shape=None,
pooling=None,
classes=1000,
**kwargs):
return EfficientNet(1.6, 2.2, 456, 0.4,
model_name='efficientnet-b5',
include_top=include_top, weights=weights,
input_tensor=input_tensor, input_shape=input_shape,
pooling=pooling, classes=classes,
**kwargs)
def EfficientNetB6(include_top=True,
weights='imagenet',
input_tensor=None,
input_shape=None,
pooling=None,
classes=1000,
**kwargs):
return EfficientNet(1.8, 2.6, 528, 0.5,
model_name='efficientnet-b6',
include_top=include_top, weights=weights,
input_tensor=input_tensor, input_shape=input_shape,
pooling=pooling, classes=classes,
**kwargs)
def EfficientNetB7(include_top=True,
weights='imagenet',
input_tensor=None,
input_shape=None,
pooling=None,
classes=1000,
**kwargs):
return EfficientNet(2.0, 3.1, 600, 0.5,
model_name='efficientnet-b7',
include_top=include_top, weights=weights,
input_tensor=input_tensor, input_shape=input_shape,
pooling=pooling, classes=classes,
**kwargs)
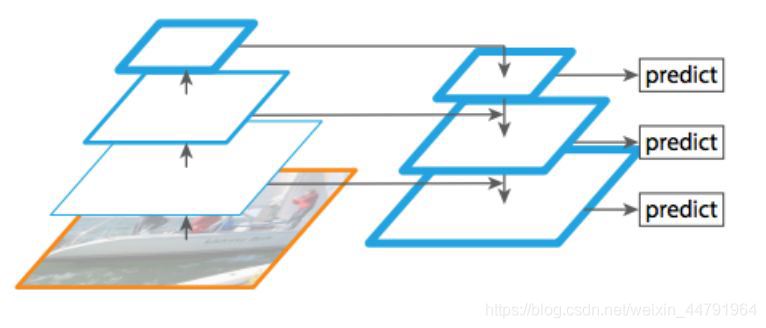
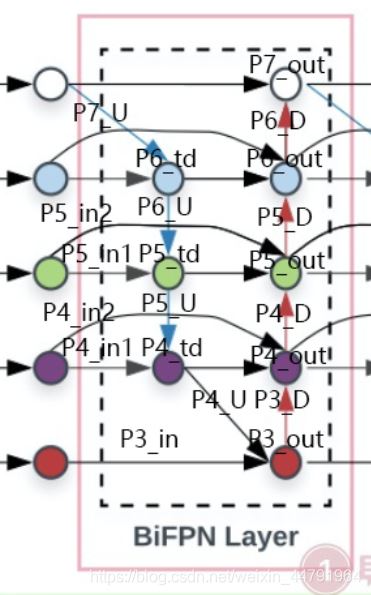
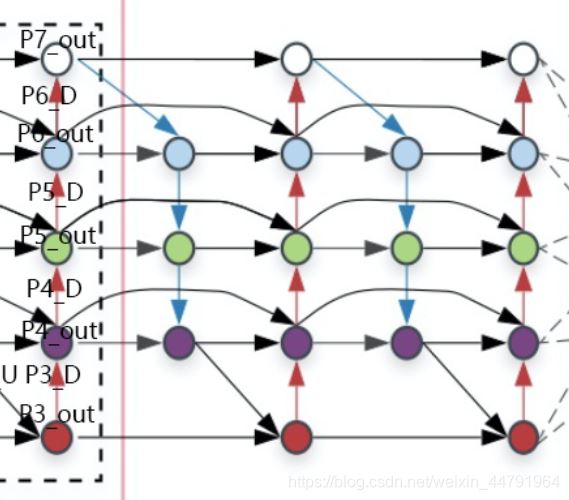
2、BiFPN加強特征提取
BiFPN簡單來講是一個加強版本的FPN����,上圖是BiFPN����,下圖是普通的FPN�����,大家可以看到��,與普通的FPN相比,BiFPN的FPN構建更加復雜�,中間還增加了許多連接����。
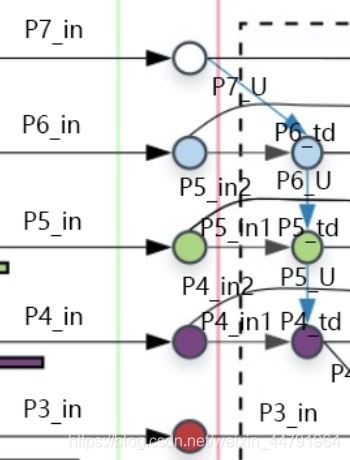
構建BiFPN可以分為多步:
1���、獲得P3_in、P4_in�、P5_in����、P6_in、P7_in����,通過主干特征提取網絡���,我們已經可以獲得P3����、P4�����、P5,還需要進行兩次下采樣獲得P6�����、P7����。
P3�����、P4、P5在經過1x1卷積調整通道數后�����,就可以作為P3_in��、P4_in���、P5_in了,在構建BiFPN的第一步�����,需要構建兩個P4_in�����、P5_in(原版是這樣設計的)。

實現代碼如下:
_, _, C3, C4, C5 = features
# 第一次BIFPN需要 下采樣 與 降通道 獲得 p3_in p4_in p5_in p6_in p7_in
#-----------------------------下采樣 與 降通道----------------------------#
P3_in = C3
P3_in = layers.Conv2D(num_channels, kernel_size=1, padding='same',
                        name=f'fpn_cells/cell_{id}/fnode3/resample_0_0_8/conv2d')(P3_in)
P3_in = layers.BatchNormalization(momentum=MOMENTUM, epsilon=EPSILON,
                                    name=f'fpn_cells/cell_{id}/fnode3/resample_0_0_8/bn')(P3_in)

P4_in = C4
P4_in_1 = layers.Conv2D(num_channels, kernel_size=1, padding='same',
                        name=f'fpn_cells/cell_{id}/fnode2/resample_0_1_7/conv2d')(P4_in)
P4_in_1 = layers.BatchNormalization(momentum=MOMENTUM, epsilon=EPSILON,
                                    name=f'fpn_cells/cell_{id}/fnode2/resample_0_1_7/bn')(P4_in_1)
P4_in_2 = layers.Conv2D(num_channels, kernel_size=1, padding='same',
                        name=f'fpn_cells/cell_{id}/fnode4/resample_0_1_9/conv2d')(P4_in)
P4_in_2 = layers.BatchNormalization(momentum=MOMENTUM, epsilon=EPSILON,
                                    name=f'fpn_cells/cell_{id}/fnode4/resample_0_1_9/bn')(P4_in_2)

P5_in = C5
P5_in_1 = layers.Conv2D(num_channels, kernel_size=1, padding='same',
                        name=f'fpn_cells/cell_{id}/fnode1/resample_0_2_6/conv2d')(P5_in)
P5_in_1 = layers.BatchNormalization(momentum=MOMENTUM, epsilon=EPSILON,
                                    name=f'fpn_cells/cell_{id}/fnode1/resample_0_2_6/bn')(P5_in_1)
P5_in_2 = layers.Conv2D(num_channels, kernel_size=1, padding='same',
                        name=f'fpn_cells/cell_{id}/fnode5/resample_0_2_10/conv2d')(P5_in)
P5_in_2 = layers.BatchNormalization(momentum=MOMENTUM, epsilon=EPSILON,
                                    name=f'fpn_cells/cell_{id}/fnode5/resample_0_2_10/bn')(P5_in_2)

P6_in = layers.Conv2D(num_channels, kernel_size=1, padding='same', name='resample_p6/conv2d')(C5)
P6_in = layers.BatchNormalization(momentum=MOMENTUM, epsilon=EPSILON, name='resample_p6/bn')(P6_in)
P6_in = layers.MaxPooling2D(pool_size=3, strides=2, padding='same', name='resample_p6/maxpool')(P6_in)

P7_in = layers.MaxPooling2D(pool_size=3, strides=2, padding='same', name='resample_p7/maxpool')(P6_in)
#-------------------------------------------------------------------------#
2、在獲得P3_in�����、P4_in_1��、P4_in_2��、P5_in_1���、P5_in_2����、P6_in���、P7_in之后需要對P7_in進行上采樣,上采樣后與P6_in堆疊獲得P6_td����;之后對P6_td進行上采樣�,上采樣后與P5_in_1進行堆疊獲得P5_td�;之后對P5_td進行上采樣��,上采樣后與P4_in_1進行堆疊獲得P4_td����;之后對P4_td進行上采樣,上采樣后與P3_in進行堆疊獲得P3_out����。
實現代碼如下:
#--------------------------構建BIFPN的上下采樣循環(huán)-------------------------#
P7_U = layers.UpSampling2D()(P7_in)
P6_td = wBiFPNAdd(name=f'fpn_cells/cell_{id}/fnode0/add')([P6_in, P7_U])
P6_td = layers.Activation(lambda x: tf.nn.swish(x))(P6_td)
P6_td = SeparableConvBlock(num_channels=num_channels, kernel_size=3, strides=1,
                            name=f'fpn_cells/cell_{id}/fnode0/op_after_combine5')(P6_td)

P6_U = layers.UpSampling2D()(P6_td)
P5_td = wBiFPNAdd(name=f'fpn_cells/cell_{id}/fnode1/add')([P5_in_1, P6_U])
P5_td = layers.Activation(lambda x: tf.nn.swish(x))(P5_td)
P5_td = SeparableConvBlock(num_channels=num_channels, kernel_size=3, strides=1,
                            name=f'fpn_cells/cell_{id}/fnode1/op_after_combine6')(P5_td)

P5_U = layers.UpSampling2D()(P5_td)
P4_td = wBiFPNAdd(name=f'fpn_cells/cell_{id}/fnode2/add')([P4_in_1, P5_U])
P4_td = layers.Activation(lambda x: tf.nn.swish(x))(P4_td)
P4_td = SeparableConvBlock(num_channels=num_channels, kernel_size=3, strides=1,
                            name=f'fpn_cells/cell_{id}/fnode2/op_after_combine7')(P4_td)

P4_U = layers.UpSampling2D()(P4_td)
P3_out = wBiFPNAdd(name=f'fpn_cells/cell_{id}/fnode3/add')([P3_in, P4_U])
P3_out = layers.Activation(lambda x: tf.nn.swish(x))(P3_out)
P3_out = SeparableConvBlock(num_channels=num_channels, kernel_size=3, strides=1,
                            name=f'fpn_cells/cell_{id}/fnode3/op_after_combine8')(P3_out)
#-------------------------------------------------------------------------#
3、在獲得P3_out����、P4_td����、P4_in_2���、P5_td����、P5_in_2��、P6_in����、P6_td、P7_in之后�,之后需要對P3_out進行下采樣�,下采樣后與P4_td��、P4_in_2堆疊獲得P4_out��;之后對P4_out進行下采樣��,下采樣后與P5_td���、P5_in_2進行堆疊獲得P5_out;之后對P5_out進行下采樣�,下采樣后與P6_in�、P6_td進行堆疊獲得P6_out�����;之后對P6_out進行下采樣���,下采樣后與P7_in進行堆疊獲得P7_out�。
實現代碼如下:
#--------------------------構建BIFPN的上下采樣循環(huán)-------------------------#
P3_D = layers.MaxPooling2D(pool_size=3, strides=2, padding='same')(P3_out)
P4_out = wBiFPNAdd(name=f'fpn_cells/cell_{id}/fnode4/add')([P4_in_2, P4_td, P3_D])
P4_out = layers.Activation(lambda x: tf.nn.swish(x))(P4_out)
P4_out = SeparableConvBlock(num_channels=num_channels, kernel_size=3, strides=1,
                            name=f'fpn_cells/cell_{id}/fnode4/op_after_combine9')(P4_out)

P4_D = layers.MaxPooling2D(pool_size=3, strides=2, padding='same')(P4_out)
P5_out = wBiFPNAdd(name=f'fpn_cells/cell_{id}/fnode5/add')([P5_in_2, P5_td, P4_D])
P5_out = layers.Activation(lambda x: tf.nn.swish(x))(P5_out)
P5_out = SeparableConvBlock(num_channels=num_channels, kernel_size=3, strides=1,
                            name=f'fpn_cells/cell_{id}/fnode5/op_after_combine10')(P5_out)

P5_D = layers.MaxPooling2D(pool_size=3, strides=2, padding='same')(P5_out)
P6_out = wBiFPNAdd(name=f'fpn_cells/cell_{id}/fnode6/add')([P6_in, P6_td, P5_D])
P6_out = layers.Activation(lambda x: tf.nn.swish(x))(P6_out)
P6_out = SeparableConvBlock(num_channels=num_channels, kernel_size=3, strides=1,
                            name=f'fpn_cells/cell_{id}/fnode6/op_after_combine11')(P6_out)

P6_D = layers.MaxPooling2D(pool_size=3, strides=2, padding='same')(P6_out)
P7_out = wBiFPNAdd(name=f'fpn_cells/cell_{id}/fnode7/add')([P7_in, P6_D])
P7_out = layers.Activation(lambda x: tf.nn.swish(x))(P7_out)
P7_out = SeparableConvBlock(num_channels=num_channels, kernel_size=3, strides=1,
                            name=f'fpn_cells/cell_{id}/fnode7/op_after_combine12')(P7_out)
#-------------------------------------------------------------------------#
4����、將獲得的P3_out����、P4_out�����、P5_out��、P6_out、P7_out作為P3_in����、P4_in�����、P5_in�、P6_in�����、P7_in����,重復2�����、3步驟進行堆疊即可�����,對于Effiicientdet B0來講���,還需要重復2次��,需要注意P4_in_1和P4_in_2此時不需要分開了�,P5也是�����。
實現代碼如下:
P3_in, P4_in, P5_in, P6_in, P7_in = features
P7_U = layers.UpSampling2D()(P7_in)
P6_td = wBiFPNAdd(name=f'fpn_cells/cell_{id}/fnode0/add')([P6_in, P7_U])
P6_td = layers.Activation(lambda x: tf.nn.swish(x))(P6_td)
P6_td = SeparableConvBlock(num_channels=num_channels, kernel_size=3, strides=1,
                            name=f'fpn_cells/cell_{id}/fnode0/op_after_combine5')(P6_td)

P6_U = layers.UpSampling2D()(P6_td)
P5_td = wBiFPNAdd(name=f'fpn_cells/cell_{id}/fnode1/add')([P5_in, P6_U])
P5_td = layers.Activation(lambda x: tf.nn.swish(x))(P5_td)
P5_td = SeparableConvBlock(num_channels=num_channels, kernel_size=3, strides=1,
                            name=f'fpn_cells/cell_{id}/fnode1/op_after_combine6')(P5_td)

P5_U = layers.UpSampling2D()(P5_td)
P4_td = wBiFPNAdd(name=f'fpn_cells/cell_{id}/fnode2/add')([P4_in, P5_U])
P4_td = layers.Activation(lambda x: tf.nn.swish(x))(P4_td)
P4_td = SeparableConvBlock(num_channels=num_channels, kernel_size=3, strides=1,
                            name=f'fpn_cells/cell_{id}/fnode2/op_after_combine7')(P4_td)

P4_U = layers.UpSampling2D()(P4_td)
P3_out = wBiFPNAdd(name=f'fpn_cells/cell_{id}/fnode3/add')([P3_in, P4_U])
P3_out = layers.Activation(lambda x: tf.nn.swish(x))(P3_out)
P3_out = SeparableConvBlock(num_channels=num_channels, kernel_size=3, strides=1,
                            name=f'fpn_cells/cell_{id}/fnode3/op_after_combine8')(P3_out)

P3_D = layers.MaxPooling2D(pool_size=3, strides=2, padding='same')(P3_out)
P4_out = wBiFPNAdd(name=f'fpn_cells/cell_{id}/fnode4/add')([P4_in, P4_td, P3_D])
P4_out = layers.Activation(lambda x: tf.nn.swish(x))(P4_out)
P4_out = SeparableConvBlock(num_channels=num_channels, kernel_size=3, strides=1,
                            name=f'fpn_cells/cell_{id}/fnode4/op_after_combine9')(P4_out)

P4_D = layers.MaxPooling2D(pool_size=3, strides=2, padding='same')(P4_out)
P5_out = wBiFPNAdd(name=f'fpn_cells/cell_{id}/fnode5/add')([P5_in, P5_td, P4_D])
P5_out = layers.Activation(lambda x: tf.nn.swish(x))(P5_out)
P5_out = SeparableConvBlock(num_channels=num_channels, kernel_size=3, strides=1,
                            name=f'fpn_cells/cell_{id}/fnode5/op_after_combine10')(P5_out)

P5_D = layers.MaxPooling2D(pool_size=3, strides=2, padding='same')(P5_out)
P6_out = wBiFPNAdd(name=f'fpn_cells/cell_{id}/fnode6/add')([P6_in, P6_td, P5_D])
P6_out = layers.Activation(lambda x: tf.nn.swish(x))(P6_out)
P6_out = SeparableConvBlock(num_channels=num_channels, kernel_size=3, strides=1,
                            name=f'fpn_cells/cell_{id}/fnode6/op_after_combine11')(P6_out)

P6_D = layers.MaxPooling2D(pool_size=3, strides=2, padding='same')(P6_out)
P7_out = wBiFPNAdd(name=f'fpn_cells/cell_{id}/fnode7/add')([P7_in, P6_D])
P7_out = layers.Activation(lambda x: tf.nn.swish(x))(P7_out)
P7_out = SeparableConvBlock(num_channels=num_channels, kernel_size=3, strides=1,
                            name=f'fpn_cells/cell_{id}/fnode7/op_after_combine12')(P7_out)
3、從特征獲取預測結果
通過第二部的重復運算��,我們獲得了P3_out, P4_out, P5_out, P6_out, P7_out�����。
為了和普通特征層區(qū)分,我們稱之為有效特征層����,將這五個有效的特征層傳輸過ClassNet+BoxNet就可以獲得預測結果了���。
對于Efficientdet-B0來講:
ClassNet采用3次64通道的卷積和1次num_priors x num_classes的卷積,num_priors指的是該特征層所擁有的先驗框數量����,num_classes指的是網絡一共對多少類的目標進行檢測��。
BoxNet采用3次64通道的卷積和1次num_priors x 4的卷積��,num_priors指的是該特征層所擁有的先驗框數量�����,4指的是先驗框的調整情況。
需要注意的是�����,每個特征層所用的ClassNet是同一個ClassNet�;每個特征層所用的BoxNet是同一個BoxNet�����。
其中:
num_priors x 4的卷積 用于預測 該特征層上 每一個網格點上 每一個先驗框的變化情況���。**
num_priors x num_classes的卷積 用于預測 該特征層上 每一個網格點上 每一個預測框對應的種類。
實現代碼為:
class BoxNet:
    def __init__(self, width, depth, num_anchors=9, freeze_bn=False, name='box_net', **kwargs):
        self.name = name
        self.width = width
        self.depth = depth
        self.num_anchors = num_anchors
        options = {
            'kernel_size': 3,
            'strides': 1,
            'padding': 'same',
            'bias_initializer': 'zeros',
            'depthwise_initializer': initializers.VarianceScaling(),
            'pointwise_initializer': initializers.VarianceScaling(),
        }

        self.convs = [layers.SeparableConv2D(filters=width, name=f'{self.name}/box-{i}', **options) for i in range(depth)]
        self.head = layers.SeparableConv2D(filters=num_anchors * 4, name=f'{self.name}/box-predict', **options)

        self.bns = [
            [layers.BatchNormalization(momentum=MOMENTUM, epsilon=EPSILON, name=f'{self.name}/box-{i}-bn-{j}') for j in
             range(3, 8)]
            for i in range(depth)]

        self.relu = layers.Lambda(lambda x: tf.nn.swish(x))
        self.reshape = layers.Reshape((-1, 4))

    def call(self, inputs):
        feature, level = inputs
        for i in range(self.depth):
            feature = self.convs[i](feature)
            feature = self.bns[i][level](feature)
            feature = self.relu(feature)
        outputs = self.head(feature)
        outputs = self.reshape(outputs)
        return outputs


class ClassNet:
    def __init__(self, width, depth, num_classes=20, num_anchors=9, freeze_bn=False, name='class_net', **kwargs):
        self.name = name
        self.width = width
        self.depth = depth
        self.num_classes = num_classes
        self.num_anchors = num_anchors
        options = {
            'kernel_size': 3,
            'strides': 1,
            'padding': 'same',
            'depthwise_initializer': initializers.VarianceScaling(),
            'pointwise_initializer': initializers.VarianceScaling(),
        }

        self.convs = [layers.SeparableConv2D(filters=width, bias_initializer='zeros', name=f'{self.name}/class-{i}',
                                                **options)
                        for i in range(depth)]
        self.head = layers.SeparableConv2D(filters=num_classes * num_anchors,
                                            bias_initializer=PriorProbability(probability=0.01),
                                            name=f'{self.name}/class-predict', **options)

        self.bns = [
            [layers.BatchNormalization(momentum=MOMENTUM, epsilon=EPSILON, name=f'{self.name}/class-{i}-bn-{j}') for j
             in range(3, 8)]
            for i in range(depth)]

        self.relu = layers.Lambda(lambda x: tf.nn.swish(x))
        self.reshape = layers.Reshape((-1, num_classes))
        self.activation = layers.Activation('sigmoid')

    def call(self, inputs):
        feature, level = inputs
        for i in range(self.depth):
            feature = self.convs[i](feature)
            feature = self.bns[i][level](feature)
            feature = self.relu(feature)
        outputs = self.head(feature)
        outputs = self.reshape(outputs)
        outputs = self.activation(outputs)
        return outputs
4��、預測結果的解碼
我們通過對每一個特征層的處理,可以獲得三個內容���,分別是:
num_priors x 4的卷積 用于預測 該特征層上 每一個網格點上 每一個先驗框的變化情況。**
num_priors x num_classes的卷積 用于預測 該特征層上 每一個網格點上 每一個預測框對應的種類����。
每一個有效特征層對應的先驗框對應著該特征層上 每一個網格點上 預先設定好的9個框�����。
我們利用 num_priors x 4的卷積 與 每一個有效特征層對應的先驗框 獲得框的真實位置����。
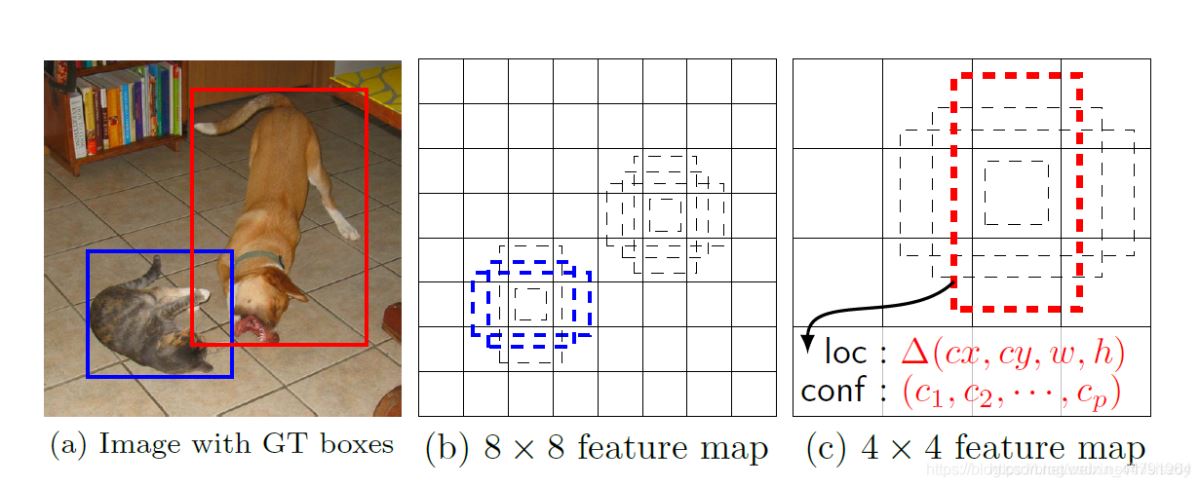
每一個有效特征層對應的先驗框就是�,如圖所示的作用:
每一個有效特征層將整個圖片分成與其長寬對應的網格����,如P3的特征層就是將整個圖像分成64x64個網格;然后從每個網格中心建立9個先驗框����,一共64x64x9個�����,36864個先驗框����。
先驗框雖然可以代表一定的框的位置信息與框的大小信息��,但是其是有限的���,無法表示任意情況,因此還需要調整���,Efficientdet利用3次64通道的卷積+num_priors x 4的卷積的結果對先驗框進行調整�。
num_priors x 4中的num_priors表示了這個網格點所包含的先驗框數量��,其中的4表示了框的左上角xy軸�����,右下角xy的調整情況�。
Efficientdet解碼過程就是將對應的先驗框的左上角和右下角進行位置的調整�����,調整完的結果就是預測框的位置了�。
當然得到最終的預測結構后還要進行得分排序與非極大抑制篩選這一部分基本上是所有目標檢測通用的部分�。
1��、取出每一類得分大于confidence_threshold的框和得分��。
2�����、利用框的位置和得分進行非極大抑制。
實現代碼如下:
def decode_boxes(self, mbox_loc, mbox_priorbox):
# 獲得先驗框的寬與高
prior_width = mbox_priorbox[:, 2] - mbox_priorbox[:, 0]
prior_height = mbox_priorbox[:, 3] - mbox_priorbox[:, 1]
# 獲得先驗框的中心點
prior_center_x = 0.5 * (mbox_priorbox[:, 2] + mbox_priorbox[:, 0])
prior_center_y = 0.5 * (mbox_priorbox[:, 3] + mbox_priorbox[:, 1])
# 真實框距離先驗框中心的xy軸偏移情況
decode_bbox_center_x = mbox_loc[:, 0] * prior_width * 0.1
decode_bbox_center_x += prior_center_x
decode_bbox_center_y = mbox_loc[:, 1] * prior_height * 0.1
decode_bbox_center_y += prior_center_y
# 真實框的寬與高的求取
decode_bbox_width = np.exp(mbox_loc[:, 2] * 0.2)
decode_bbox_width *= prior_width
decode_bbox_height = np.exp(mbox_loc[:, 3] * 0.2)
decode_bbox_height *= prior_height
# 獲取真實框的左上角與右下角
decode_bbox_xmin = decode_bbox_center_x - 0.5 * decode_bbox_width
decode_bbox_ymin = decode_bbox_center_y - 0.5 * decode_bbox_height
decode_bbox_xmax = decode_bbox_center_x + 0.5 * decode_bbox_width
decode_bbox_ymax = decode_bbox_center_y + 0.5 * decode_bbox_height
# 真實框的左上角與右下角進行堆疊
decode_bbox = np.concatenate((decode_bbox_xmin[:, None],
decode_bbox_ymin[:, None],
decode_bbox_xmax[:, None],
decode_bbox_ymax[:, None]), axis=-1)
# 防止超出0與1
decode_bbox = np.minimum(np.maximum(decode_bbox, 0.0), 1.0)
return decode_bbox
def detection_out(self, predictions, mbox_priorbox, background_label_id=0, keep_top_k=200,
confidence_threshold=0.4):
# 網絡預測的結果
mbox_loc = predictions[0]
# 先驗框
mbox_priorbox = mbox_priorbox
# 置信度
mbox_conf = predictions[1]
results = []
# 對每一個圖片進行處理
for i in range(len(mbox_loc)):
results.append([])
decode_bbox = self.decode_boxes(mbox_loc[i], mbox_priorbox)
for c in range(self.num_classes):
c_confs = mbox_conf[i, :, c]
c_confs_m = c_confs > confidence_threshold
if len(c_confs[c_confs_m]) > 0:
# 取出得分高于confidence_threshold的框
boxes_to_process = decode_bbox[c_confs_m]
confs_to_process = c_confs[c_confs_m]
# 進行iou的非極大抑制
feed_dict = {self.boxes: boxes_to_process,
self.scores: confs_to_process}
idx = self.sess.run(self.nms, feed_dict=feed_dict)
# 取出在非極大抑制中效果較好的內容
good_boxes = boxes_to_process[idx]
confs = confs_to_process[idx][:, None]
# 將label����、置信度�、框的位置進行堆疊��。
labels = c * np.ones((len(idx), 1))
c_pred = np.concatenate((labels, confs, good_boxes),
axis=1)
# 添加進result里
results[-1].extend(c_pred)
if len(results[-1]) > 0:
# 按照置信度進行排序
results[-1] = np.array(results[-1])
argsort = np.argsort(results[-1][:, 1])[::-1]
results[-1] = results[-1][argsort]
# 選出置信度最大的keep_top_k個
results[-1] = results[-1][:keep_top_k]
# 獲得����,在所有預測結果里面�����,置信度比較高的框
# 還有�����,利用先驗框和m2det的預測結果,處理獲得了真實框(預測框)的位置
return results
5�、在原圖上進行繪制
通過第三步����,我們可以獲得預測框在原圖上的位置,而且這些預測框都是經過篩選的����。這些篩選后的框可以直接繪制在圖片上,就可以獲得結果了�����。
二���、訓練部分
1、真實框的處理
從預測部分我們知道��,每個特征層的預測結果�,num_priors x 4的卷積 用于預測 該特征層上 每一個網格點上 每一個先驗框的變化情況����。
也就是說���,我們直接利用Efficientdet網絡預測到的結果,并不是預測框在圖片上的真實位置��,需要解碼才能得到真實位置����。
而在訓練的時候�,我們需要計算loss函數����,這個loss函數是相對于Efficientdet網絡的預測結果的�����。我們需要把圖片輸入到當前的Efficientdet網絡中�,得到預測結果���;同時還需要把真實框的信息����,進行編碼�,這個編碼是把真實框的位置信息格式轉化為Efficientdet預測結果的格式信息����。
也就是,我們需要找到 每一張用于訓練的圖片的每一個真實框對應的先驗框���,并求出如果想要得到這樣一個真實框,我們的預測結果應該是怎么樣的�����。
從預測結果獲得真實框的過程被稱作解碼����,而從真實框獲得預測結果的過程就是編碼的過程�����。
因此我們只需要將解碼過程逆過來就是編碼過程了�����。
實現代碼如下:
def encode_box(self, box, return_iou=True):
iou = self.iou(box)
encoded_box = np.zeros((self.num_priors, 4 + return_iou))
# 找到每一個真實框�,重合程度較高的先驗框
assign_mask = iou > self.overlap_threshold
if not assign_mask.any():
assign_mask[iou.argmax()] = True
if return_iou:
encoded_box[:, -1][assign_mask] = iou[assign_mask]
# 找到對應的先驗框
assigned_priors = self.priors[assign_mask]
# 逆向編碼��,將真實框轉化為Efficientdet預測結果的格式
assigned_priors_w = (assigned_priors[:, 2] -
assigned_priors[:, 0])
assigned_priors_h = (assigned_priors[:, 3] -
assigned_priors[:, 1])
encoded_box[:,0][assign_mask] = (box[0] - assigned_priors[:, 0])/assigned_priors_w/0.2
encoded_box[:,1][assign_mask] = (box[1] - assigned_priors[:, 1])/assigned_priors_h/0.2
encoded_box[:,2][assign_mask] = (box[2] - assigned_priors[:, 2])/assigned_priors_w/0.2
encoded_box[:,3][assign_mask] = (box[3] - assigned_priors[:, 3])/assigned_priors_h/0.2
return encoded_box.ravel()
利用上述代碼我們可以獲得��,真實框對應的所有的iou較大先驗框,并計算了真實框對應的所有iou較大的先驗框應該有的預測結果���。
但是由于原始圖片中可能存在多個真實框,可能同一個先驗框會與多個真實框重合度較高�,我們只取其中與真實框重合度最高的就可以了�。
因此我們還要經過一次篩選�����,將上述代碼獲得的真實框對應的所有的iou較大先驗框的預測結果中,iou最大的那個真實框篩選出來��。
通過assign_boxes我們就獲得了����,輸入進來的這張圖片�,應該有的預測結果是什么樣子的����。
實現代碼如下:
def assign_boxes(self, boxes):
assignment = np.zeros((self.num_priors, 4 + 1 + self.num_classes + 1))
assignment[:, 4] = 0.0
assignment[:, -1] = 0.0
if len(boxes) == 0:
return assignment
# 對每一個真實框都進行iou計算
ingored_boxes = np.apply_along_axis(self.ignore_box, 1, boxes[:, :4])
# 取重合程度最大的先驗框���,并且獲取這個先驗框的index
ingored_boxes = ingored_boxes.reshape(-1, self.num_priors, 1)
# (num_priors)
ignore_iou = ingored_boxes[:, :, 0].max(axis=0)
# (num_priors)
ignore_iou_mask = ignore_iou > 0
assignment[:, 4][ignore_iou_mask] = -1
assignment[:, -1][ignore_iou_mask] = -1
# (n, num_priors, 5)
encoded_boxes = np.apply_along_axis(self.encode_box, 1, boxes[:, :4])
# 每一個真實框的編碼后的值����,和iou
# (n, num_priors)
encoded_boxes = encoded_boxes.reshape(-1, self.num_priors, 5)
# 取重合程度最大的先驗框��,并且獲取這個先驗框的index
# (num_priors)
best_iou = encoded_boxes[:, :, -1].max(axis=0)
# (num_priors)
best_iou_idx = encoded_boxes[:, :, -1].argmax(axis=0)
# (num_priors)
best_iou_mask = best_iou > 0
# 某個先驗框它屬于哪個真實框
best_iou_idx = best_iou_idx[best_iou_mask]
assign_num = len(best_iou_idx)
# 保留重合程度最大的先驗框的應該有的預測結果
# 哪些先驗框存在真實框
encoded_boxes = encoded_boxes[:, best_iou_mask, :]
assignment[:, :4][best_iou_mask] = encoded_boxes[best_iou_idx,np.arange(assign_num),:4]
# 4代表為背景的概率,為0
assignment[:, 4][best_iou_mask] = 1
assignment[:, 5:-1][best_iou_mask] = boxes[best_iou_idx, 4:]
assignment[:, -1][best_iou_mask] = 1
# 通過assign_boxes我們就獲得了����,輸入進來的這張圖片,應該有的預測結果是什么樣子的
return assignment
focal會忽略一些重合度相對較高但是不是非常高的先驗框����,一般將重合度在0.4-0.5之間的先驗框進行忽略�����。
實現代碼如下:
def ignore_box(self, box):
iou = self.iou(box)
ignored_box = np.zeros((self.num_priors, 1))
# 找到每一個真實框�����,重合程度較高的先驗框
assign_mask = (iou > self.ignore_threshold)(iouself.overlap_threshold)
if not assign_mask.any():
assign_mask[iou.argmax()] = True
ignored_box[:, 0][assign_mask] = iou[assign_mask]
return ignored_box.ravel()
2��、利用處理完的真實框與對應圖片的預測結果計算loss
loss的計算分為兩個部分:
1、Smooth Loss:獲取所有正標簽的框的預測結果的回歸loss��。
2���、Focal Loss:獲取所有未被忽略的種類的預測結果的交叉熵loss�。
由于在Efficientdet的訓練過程中�����,正負樣本極其不平衡�����,即 存在對應真實框的先驗框可能只有若干個,但是不存在對應真實框的負樣本卻有上萬個,這就會導致負樣本的loss值極大�,因此引入了Focal Loss進行正負樣本的平衡,關于Focal Loss的介紹可以看這個博客��。
https://blog.csdn.net/weixin_44791964/article/details/102853782
實現代碼如下:
def focal(alpha=0.25, gamma=2.0):
    def _focal(y_true, y_pred):
        # y_true [batch_size, num_anchor, num_classes+1]
        # y_pred [batch_size, num_anchor, num_classes]
        labels         = y_true[:, :, :-1]
        anchor_state   = y_true[:, :, -1]  # -1 是需要忽略的, 0 是背景, 1 是存在目標
        classification = y_pred

        # 找出存在目標的先驗框
        indices_for_object        = backend.where(keras.backend.equal(anchor_state, 1))
        labels_for_object         = backend.gather_nd(labels, indices_for_object)
        classification_for_object = backend.gather_nd(classification, indices_for_object)

        # 計算每一個先驗框應該有的權重
        alpha_factor_for_object = keras.backend.ones_like(labels_for_object) * alpha
        alpha_factor_for_object = backend.where(keras.backend.equal(labels_for_object, 1), alpha_factor_for_object, 1 - alpha_factor_for_object)
        focal_weight_for_object = backend.where(keras.backend.equal(labels_for_object, 1), 1 - classification_for_object, classification_for_object)
        focal_weight_for_object = alpha_factor_for_object * focal_weight_for_object ** gamma

        # 將權重乘上所求得的交叉熵
        cls_loss_for_object = focal_weight_for_object * keras.backend.binary_crossentropy(labels_for_object, classification_for_object)

        # 找出實際上為背景的先驗框
        indices_for_back        = backend.where(keras.backend.equal(anchor_state, 0))
        labels_for_back         = backend.gather_nd(labels, indices_for_back)
        classification_for_back = backend.gather_nd(classification, indices_for_back)

        # 計算每一個先驗框應該有的權重
        alpha_factor_for_back = keras.backend.ones_like(labels_for_back) * alpha
        alpha_factor_for_back = backend.where(keras.backend.equal(labels_for_back, 1), alpha_factor_for_back, 1 - alpha_factor_for_back)
        focal_weight_for_back = backend.where(keras.backend.equal(labels_for_back, 1), 1 - classification_for_back, classification_for_back)
        focal_weight_for_back = alpha_factor_for_back * focal_weight_for_back ** gamma

        # 將權重乘上所求得的交叉熵
        cls_loss_for_back = focal_weight_for_back * keras.backend.binary_crossentropy(labels_for_back, classification_for_back)

        # 標準化,實際上是正樣本的數量
        normalizer = tf.where(keras.backend.equal(anchor_state, 1))
        normalizer = keras.backend.cast(keras.backend.shape(normalizer)[0], keras.backend.floatx())
        normalizer = keras.backend.maximum(keras.backend.cast_to_floatx(1.0), normalizer)

        # 將所獲得的loss除上正樣本的數量
        cls_loss_for_object = keras.backend.sum(cls_loss_for_object)
        cls_loss_for_back = keras.backend.sum(cls_loss_for_back)

        # 總的loss
        loss = (cls_loss_for_object + cls_loss_for_back)/normalizer

        return loss
    return _focal

def smooth_l1(sigma=3.0):
    sigma_squared = sigma ** 2

    def _smooth_l1(y_true, y_pred):
        # y_true [batch_size, num_anchor, 4+1]
        # y_pred [batch_size, num_anchor, 4]
        regression        = y_pred
        regression_target = y_true[:, :, :-1]
        anchor_state      = y_true[:, :, -1]

        # 找到正樣本
        indices           = tf.where(keras.backend.equal(anchor_state, 1))
        regression        = tf.gather_nd(regression, indices)
        regression_target = tf.gather_nd(regression_target, indices)

        # 計算 smooth L1 loss
        # f(x) = 0.5 * (sigma * x)^2          if |x|  1 / sigma / sigma
        #        |x| - 0.5 / sigma / sigma    otherwise
        regression_diff = regression - regression_target
        regression_diff = keras.backend.abs(regression_diff)
        regression_loss = backend.where(
            keras.backend.less(regression_diff, 1.0 / sigma_squared),
            0.5 * sigma_squared * keras.backend.pow(regression_diff, 2),
            regression_diff - 0.5 / sigma_squared
        )

        normalizer = keras.backend.maximum(1, keras.backend.shape(indices)[0])
        normalizer = keras.backend.cast(normalizer, dtype=keras.backend.floatx())
        loss = keras.backend.sum(regression_loss) / normalizer

        return loss

    return _smooth_l1
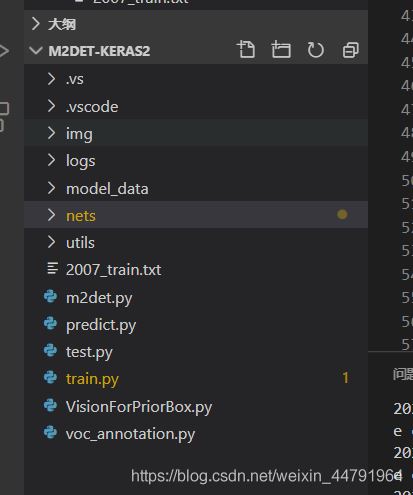
訓練自己的Efficientdet模型
Efficientdet整體的文件夾構架如下:
本文使用VOC格式進行訓練����。
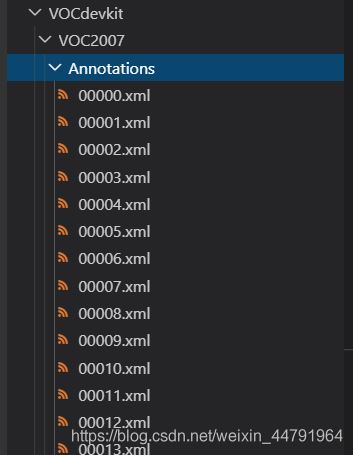
訓練前將標簽文件放在VOCdevkit文件夾下的VOC2007文件夾下的Annotation中����。
訓練前將圖片文件放在VOCdevkit文件夾下的VOC2007文件夾下的JPEGImages中。

在訓練前利用voc2efficientdet.py文件生成對應的txt���。
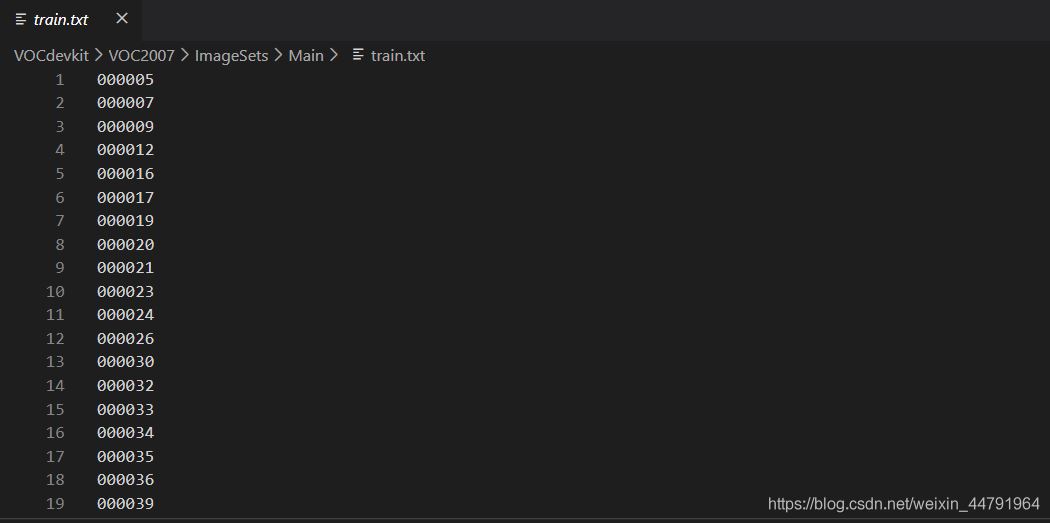
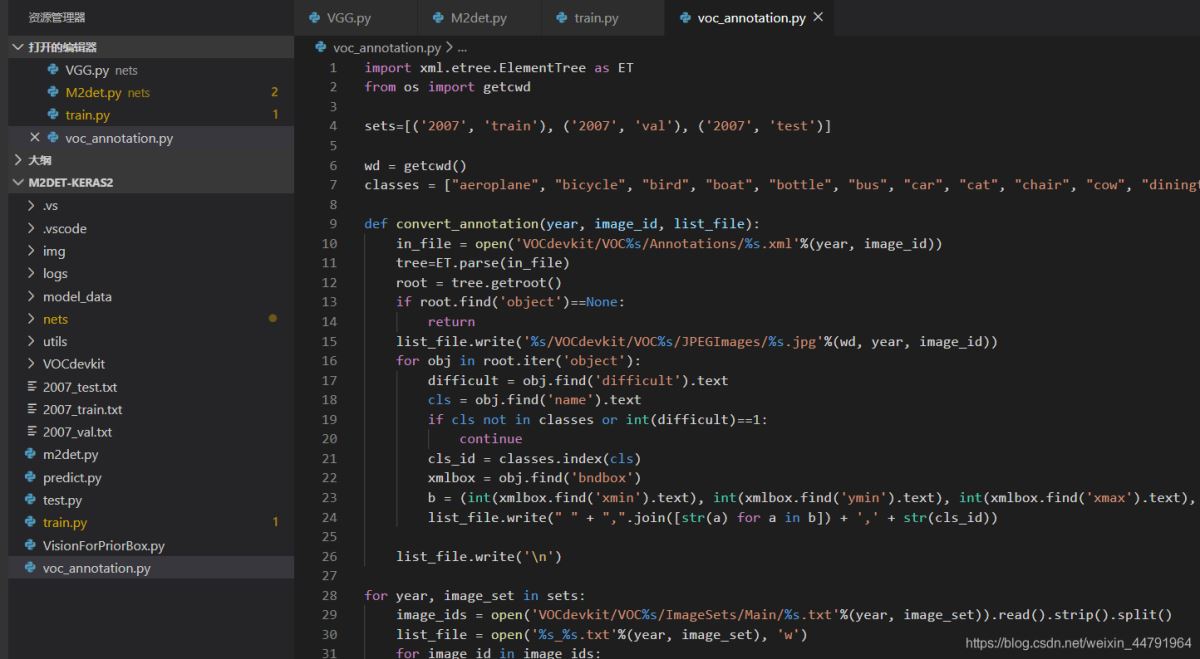
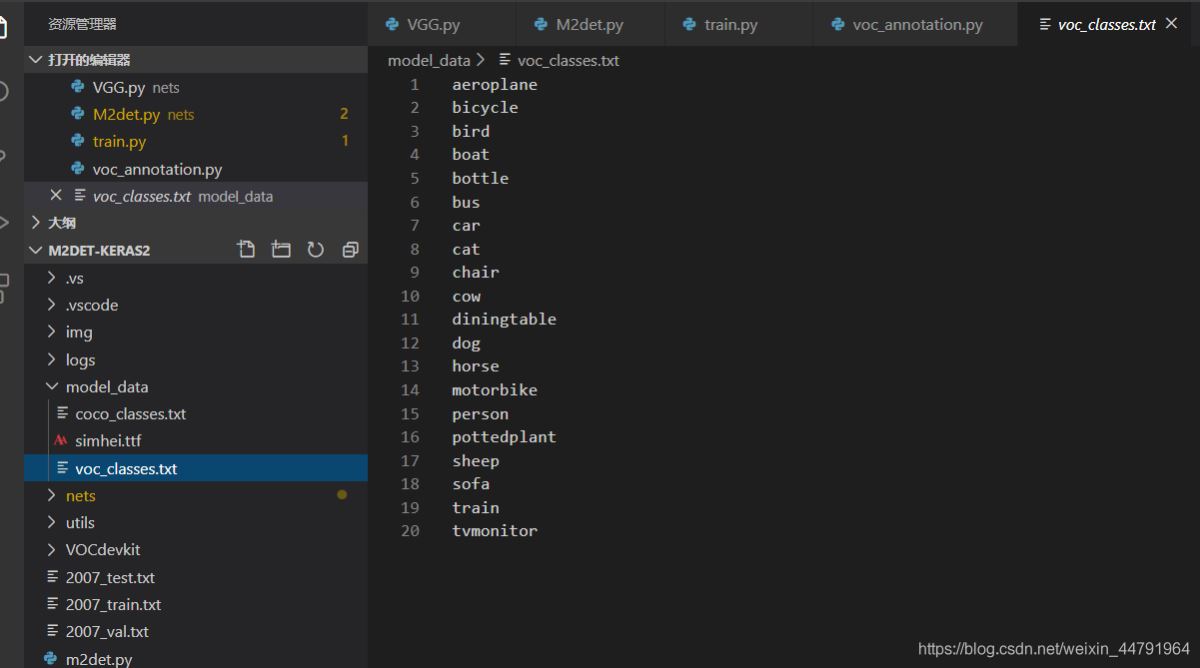
再運行根目錄下的voc_annotation.py,運行前需要將classes改成你自己的classes�����。
classes = ["aeroplane", "bicycle", "bird", "boat", "bottle", "bus", "car", "cat", "chair", "cow", "diningtable", "dog", "horse", "motorbike", "person", "pottedplant", "sheep", "sofa", "train", "tvmonitor"]
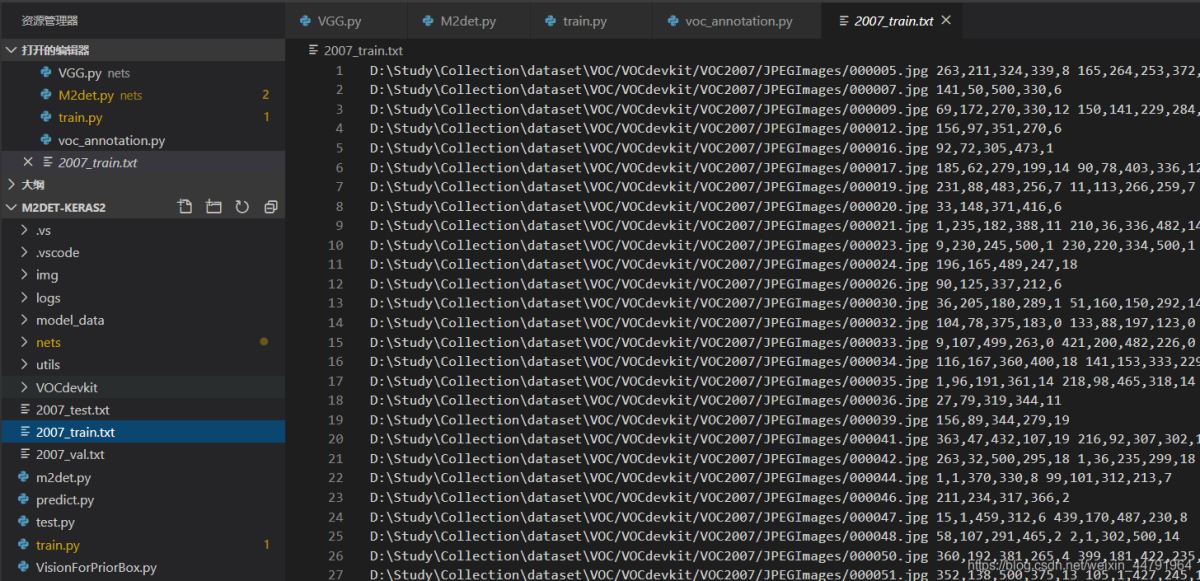
就會生成對應的2007_train.txt��,每一行對應其圖片位置及其真實框的位置�����。
在訓練前需要修改model_data里面的voc_classes.txt文件��,需要將classes改成你自己的classes�。
運行train.py即可開始訓練�。

修改train.py文件下的phi可以修改efficientdet的版本,訓練前注意權重文件與Efficientdet版本的對齊�����。
以上就是Keras搭建Efficientdet目標檢測平臺的詳細內容���,更多關于Efficientdet目標檢測的資料請關注腳本之家其它相關文章!
您可能感興趣的文章:- 利用ImageAI庫只需幾行python代碼實現目標檢測
- Python Opencv任意形狀目標檢測并繪制框圖
- 10 行Python 代碼實現 AI 目標檢測技術【推薦】
- python開啟攝像頭以及深度學習實現目標檢測方法